
Chopin’s Waltz No. 10, Op. 69-2 carries a sentimental and emotional melody, yet, as expected of a waltz, it also has a dance-like atmosphere woven into its composition.
There are many kinds of waltzes, but this particular piece is considered one of the easier ones. If you’re thinking, “I want to practice a Chopin piece, but I don’t know where to start,” then this is a must-read for you.
Additionally, some might think that “Chopin’s Waltzes” sound intimidating or too difficult at first glance. However, that’s precisely the time to take the leap and give it a try. It may feel challenging at the beginning, but the sense of accomplishment and joy you’ll experience when you can finally play it will be immense.
Hello! This is Mole, your piano guide.
The days have been chilly; how are you all doing?
In the fields where I live, the snow keeps piling up, and lately, I haven’t been able to leave my burrow much, which has made things a bit boring. My friend Frog is hibernating, and I hardly get to meet Mouse either.
It’s still a long way off, but I’m already looking forward to the arrival of spring.
Contents
The Perfect Difficulty Level for First-Time Waltz Players!
Now, let’s get into the main topic.
As I mentioned earlier, this piece is one of the easier waltzes among Chopin’s works. If you’re practicing Czerny’s 30 Études, Op. 849, you’ll likely find this piece manageable. It’s an excellent choice for those attempting Chopin’s waltzes for the first time.
That said, while the overall difficulty level isn’t too high, some people might struggle with the piece during the sight-reading stage.
This is because the piece is characterized by frequent changes in accidentals and key signatures. Therefore, it’s crucial to ensure you’ve accurately interpreted the information on the sheet music before you begin playing.

The Structure is Very Simple and Easy to Understand!
First, listen to the following video.As you may notice upon listening to the video, this piece has a rather repetitive structure, making it quite simple overall.
However, if you play a simple structure in a straightforward manner, it might leave a somewhat bland impression. Therefore, adding dynamics and other nuances becomes essential.
In this article, we’ll break the piece into the following sections and explain each one.
– Section A1 (Start–0:46)
– Section B1 (0:47–2:13)
– Section C (2:14–2:56)
– Section A2 (2:56–3:16)
– Section B2 (3:16–End)
The times in parentheses correspond to the video. By thoroughly watching the video in advance, you can get an overall sense of the piece.
Now, let’s start practicing!
Mole’s Tips for Playing
☆Section A1: Focus on the Waltz Rhythm
Section A1 begins immediately with that sentimental melody.The right hand plays the main melody, while the left hand maintains the waltz rhythm. Practice each hand separately and thoroughly while keeping the waltz in mind.
 ‘Moderato’ means ‘at a moderate speed.’
Looking at the initial tempo marking, the piece might feel a little fast. I personally thought it was a bit fast too.
That said, there’s no need to be overly concerned about speed. What’s more important is to play freely at a tempo you feel comfortable with.
However, do make use of a metronome. While you don’t need to obsess over the overall tempo, speeding up or slowing down unnecessarily during the piece can give a clumsy impression.
Especially in sections where there are no specific instructions like “gradually slower” or “return to the original tempo,” aim to maintain a steady tempo during practice.
When using a metronome, start at a manageable speed.
 ‘cresc.’ is short for ‘crescendo,’ meaning ‘gradually louder.’
 ‘rit.’ is short for ‘ritardando,’ meaning ‘gradually slower.’
‘dim.’ is short for ‘diminuendo,’ meaning ‘gradually softer.’
This section might feel somewhat tricky for the right hand. (0:19–)
Pay attention to finger movements here. Especially in areas with slurs (meaning: play smoothly), be careful not to let the notes break, and aim to keep the notes evenly articulated for a clean sound.
When I was practicing this piece in the past, I found this part particularly challenging.
That’s because while the left hand undergoes various chord changes, which is already demanding, the right hand also requires focused attention.
This doesn’t apply only to this section, but if you get stuck even during the stage of practicing with both hands, I recommend going back to practicing each hand separately.
☆Section B1: Let’s Consider How to Add Nuances
Section B1 gives the impression of a slight variation or development of the melody from Section A1. (0:47–)Here as well, the first priority is to be able to play at a consistent speed. Once you achieve that and feel more confident, the next step is to think about how to effectively add nuances.
 ‘a tempo’ means ‘return to the original speed’
 ‘con anima’ means ‘with animation’
Just before the section shown in the above sheet music (the ending of Section A1), there is a notation to gradually slow down the tempo as you approach Section B1. At this point, the original tempo resumes.
For the right hand, adding nuances as if singing while maintaining a steady tempo will help emphasize the contrast with Section A1, making the piece more expressive.
As for the left hand, it might be interesting to play it slightly lighter compared to Section A1.
One common characteristic of waltzes is that the use of the pedal can be quite challenging for every piece.
This is just my personal opinion, but in terms of pedal technique, I feel that waltzes are among Chopin’s works that offer particularly good opportunities for study.
Taking this opportunity to thoroughly explore pedal usage could be a highly meaningful aspect of your practice.
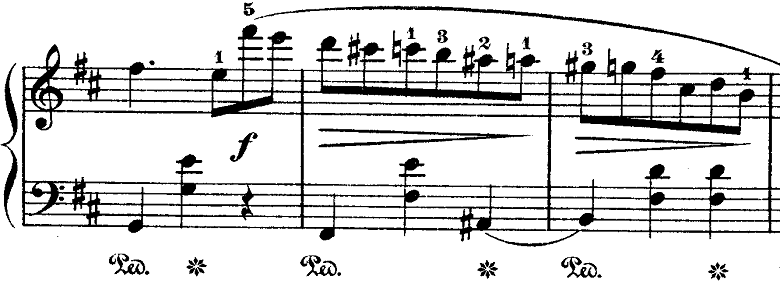
This part features an intensifying melody, but keeping the left hand’s volume subdued will create a more composed impression. (1:06–)
Additionally, the right hand involves a somewhat extended chromatic descent.
In such sections, it is essential to practice smooth finger movements to avoid tangling or interrupting the melody.
As mentioned earlier, if you hit a wall during both-hands practice, go back to practicing each hand separately and continue to work on it.
☆Section C: Pay Attention to the Change in Key
In Section C, the key changes, and the atmosphere suddenly becomes bright and brilliant. (2:14–)The key shifts from B minor to B major. With this, the number of accidentals, such as sharps, increases significantly. Be careful not to misread the notes while sight-reading.
 The meaning of ‘dolce’ is ‘gently.’
It is important to focus on resetting your emotions in this part. From here, the music continues with a cheerful and brilliant melody, so for now, set aside the sentimentality up to Section B1.
However, some of you might be thinking, “How on earth am I supposed to get through this section with so many accidentals? This piece is really difficult!” and feel your motivation waning at this point.
In fact, when I was practicing this piece, I struggled quite a bit with this section. Despite its delightful sound, the sheet music was so complicated that I couldn’t enjoy the atmosphere at all.
That said, once you get past this part, you’re almost done with the piece. Don’t give up—persist in practicing patiently. This might sound like a cliché, but you just have to keep trying. If you believe that you will eventually master it and keep practicing, you will. Truly, “perseverance is strength.”
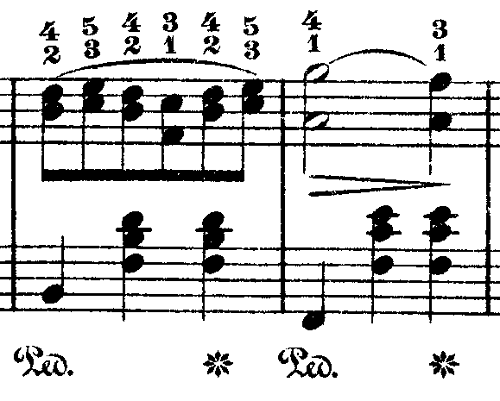
The right hand, composed of chords, can be a stumbling block. (2:34–)
For such sections, it’s essential to practice hands separately at a slow tempo, but additional strategies may also be needed.
Honestly, for sections like this, trying to play smoothly right from the start often doesn’t go well. I also struggled here.
So, what specific strategies can you employ? First, during one-hand practice, don’t focus on smoothness initially; instead, make it your primary goal to play each chord accurately and solidly.
Even if you can play smoothly, if the chords are uneven, it will give the impression that the music lacks direction. More importantly, uneven chords are not particularly pleasing to the ear. Once you can play the chords securely, then you can start working on smoothness.
The next crucial step for achieving smoothness is to minimize finger movement as much as possible. Large finger movements make it difficult for the chords to flow seamlessly, resulting in a less smooth sound.
When transitioning to the next chord, maintain the previous chord firmly while imagining handing off the baton to place your fingers on the next chord.
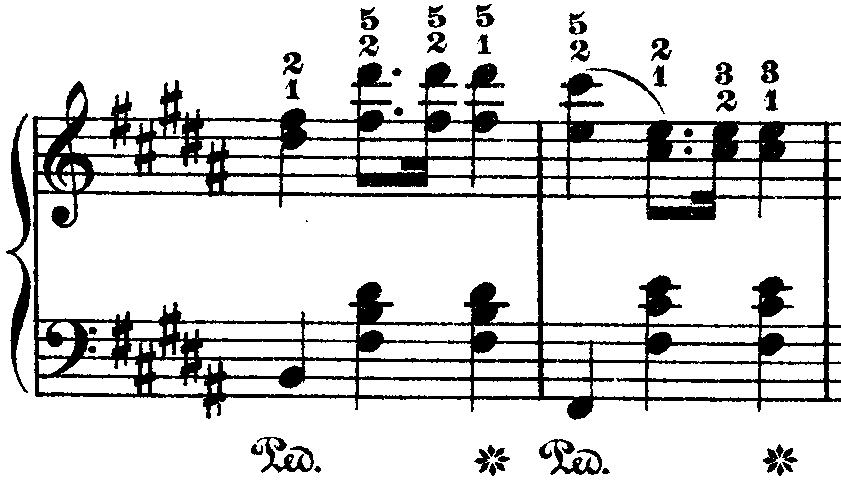
In rhythmic sections like this, play with a sense of lightness. (2:39–)
The most important thing to pay attention to here is the use of the pedal. If you overuse it, the overall sound will become heavy.
As for pedal timing, the score indicates lifting it on the third beat, but some might feel that this doesn’t quite fit or that it’s better not to use the pedal at all.
While following the score’s instructions is important, once you become somewhat proficient, I believe it’s equally important to incorporate your own interpretation of the piece alongside the score’s directions to truly complete the music.
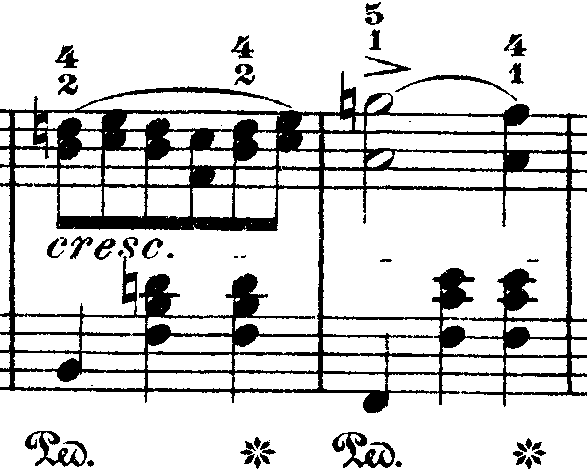
The melody, which was in B major earlier, suddenly returns to B minor here. (2:45–)
This sudden change may feel disorienting, but stay calm and work through the sight-reading.
This section is crucial as it transitions the piece into the next section. Gradually build up a sense of unease in the atmosphere here.
☆Section A2, B2: Visualize Your Own Image
Section A2(2:56–) and Section B2(3:16–) are repetitions of Section A1 and Section B1. At this point, it’s safe to say you’ve almost mastered the piece.However, keep in mind that these sections are in the latter part of the piece. In the earlier Section A1 and Section B1, you had the bright and lively Section C waiting next. But this is not the case here.
In other words, while these may seem like repetitions, they represent a new scene in terms of structure. By shifting your mindset or imagery when playing, each note may take on a different character.
For me, I personally imagine this section as “sorrow following a brief moment of happiness.”
Everyone’s imagery will be unique, but for me, I try to play with a specific image in mind, overlaying various personal memories onto the music. By creating a concrete mental image, I believe you can enjoy the piece even more deeply.
Let’s Review! A Comprehensive Summary

So far, we’ve discussed Chopin’s Waltz No. 10, Op. 69-2. How do you feel about it?
Here are a few key tips for playing the piece, summarized below:
1. Practice slowly using a metronome (especially Section A1, Section B1, Section A2, and Section B2).
2. Pay attention to changes in accidentals and key signatures (throughout the piece).
3. If you struggle with both hands, return to practicing with one hand (throughout the piece).
4. Carefully consider how to use the pedal (especially in Section B1, Section C, and Section B2).
5. Once you can play the chords evenly, focus on achieving smoothness (especially in Section C).
6. Play with your own imagery in mind (throughout the piece).
Keep these six tips in mind as you practice.
While this piece may seem relatively simple, taking a closer look reveals it offers quite a challenge. There may be times when it feels difficult, but overcoming those moments and gradually adding this piece to your repertoire will boost your motivation and make practicing the piano even more enjoyable.
Good luck with your practice! I’m cheering for you all the way from underground in the field.
- IMSLP (Sheet Music Link)
This article was created using this sheet music. It is a public domain score published by Schirmer in 1894. The collection includes both waltzes from Op. 69, with Op. 69-2 starting on page 5.
- Ranking Chopin’s Waltzes by Difficulty: A Piano Teacher’s Perspective 2017/3/17
- Perfect for a Piano Recital! Chopin's “Minute Waltz”: Difficulty and 3 Tips for Playing It 2017/5/25
- How to Master Chopin’s “Grande Valse Brillante”: Difficulty Level and Essential Waltz Techniques 2017/6/2
- Play with Fingerings That Suit You! Chopin’s “Grande Valse Brillante” Difficulty and Tips for Playing 2017/6/29
- How to Master Chopin's “Minute Waltz”: 8 Essential Tips and Difficulty Insights from a Mole 2017/7/6
- Master Chopin's “Waltz No. 7, Op. 64-2”: Tips, Tricks, and Difficulty Level Explained 2017/7/14
- Charming & Lyrical! Tips and Difficulty Level of Chopin's Waltz No. 14 in E Minor, Posthumous 2017/8/6
- Romantic Love! Chopin’s Waltz No. 9 Op. 69-1 Tips and Difficulty Level (“Farewell Waltz” or “Valse de l'adieu”) 2017/11/8
- The World of Brilliant Waltzes! How to Play and the Difficulty Level of Chopin’s “Grande Valse Brillante” 2017/12/6
- Chopin's Waltz No. 10, Op. 69-2: A Beginner’s Guide to Playing, Mastering, and Understanding Its Difficulty 2017/12/16 ←Currently Viewing Article
- Chopin’s Puppy Waltz Simplified: Easy Tips, Difficulty Level, and Playing Guide for Waltz No. 6 in D-flat Major, Op. 64-1 2018/3/9
- Chopin’s Waltz No. 15 in E Major: A Hidden Gem with Playing Tips and Difficulty Level Explained 2018/3/19
- Chopin’s Waltz No. 3 (Grande Valse Brillante) in A Minor, Op. 34-2: Difficulty and Playing Tips 2018/5/19
- Is Chopin’s “Minute Waltz” Hard? Learn 7 Tips to Conquer It Today 2019/8/1


