Chopin’s Waltz No. 14, found in the later half of his collection of waltzes, is a captivating piece that combines brilliance with a touch of lyricism.
The techniques featured in this piece are rich and varied, which may make it feel challenging for some. However, it’s precisely this allure that makes the piece so desirable. If you aspire to make this beautiful work your own, this is a must-read for you!
Hello! I’m Mole, a pianist.
Today, while I was digging enthusiastically, I bumped into an old friend. At first, I didn’t recognize them because of how much they had changed. However, they said to me, “Mole, you haven’t changed at all!”
It made me ponder: what does it mean to remain unchanged? And why do living things evolve and transform?
These are just some random musings, but let’s set them aside and jump straight into the main topic!
Contents
The difficulty level is slightly high, but careful reading of the score will see you through!

The difficulty of Chopin’s Waltz No. 14 in E Minor, Posthumous is suitable for those who have mastered pieces around the level of Czerny’s “30 New Studies in Technique” (Op.849) to the early stages of “School of Velocity” (Op.299).
Additionally, since the piece involves various techniques like arpeggios and staccatos, a certain degree of adaptability in reading the sheet music will be helpful.
Within Chopin’s waltz collection, this piece is of medium difficulty. So, it might be a good idea to familiarize yourself with one or two simpler waltzes from the collection before tackling this one.
That said, if you’re thinking, “No, this is the one I want to start with!” that’s perfectly fine too. Just dive in and play the piece you’re passionate about without overthinking it.
The structure clearly highlights transitions between sections!

This piece has a very clear structure, making the transitions between sections easy to identify. As a result, it’s relatively straightforward to break the piece into smaller, manageable practice segments.
While the overall piece might appear challenging, you’ll notice that many similar phrases are repeated throughout, making it less complex than it seems at first glance.
First, let’s listen to the video below.
In this article, we’ve divided the piece into several sections for easier understanding:
Section A (Beginning–0:20)
Section B (0:20–1:11)
Section C (1:11–1:40)
Section D (1:41–2:28)
Section E (2:28–end)
Note: The times in parentheses correspond to the video above. Be sure to watch it closely to understand the structure and atmosphere of the piece as you practice.
Now, let’s take a closer look at each section!
Tips for Playing the Mole Style!
☆How to Play Section A: Expressing an Ominous Premonition
In Section A, following the prelude, the iconic phrase that serves as the main theme of the piece begins.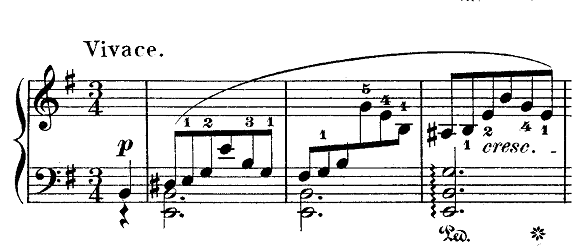 ※ “Vivace” means “lively.”
※ “cresc” is an abbreviation for “crescendo,” meaning “gradually getting louder.”
Pay close attention to finger placement at the beginning. As you can see, a large slur is indicated in this phrase, so to avoid running out of fingers, it is safer to follow the fingering notations on the sheet music as closely as possible.
The dynamics of this section can vary widely from one person to another.
Although there are no specific instructions on the score, I sometimes increase the tempo as the phrase ascends to convey a sense of urgency.
That being said, the above is just my personal interpretation. If you have an idea of how you want to express the music, even if it’s not indicated on the score, feel free to try your own approach. It will make the experience much more enjoyable. One of the features of this piece is its wide range of expressive possibilities.
 ※ “grazioso” means “gracefully, elegantly.”
This phrase appears in various parts of the piece later on. (0:08~)
Play it as lightly as possible. To achieve this, pay special attention to how you use the pedal.
There are many interpretations of pedaling, but in my personal view, this section can sound natural even with little to no pedal.
However, the sound does resonate better with some pedaling (but be careful not to overdo it). If you decide to use the pedal, I recommend applying it lightly.
☆How to Play Section B: Play Carefully
This might be a tricky section for many. To be honest, I struggled quite a bit here as well. (0:20~)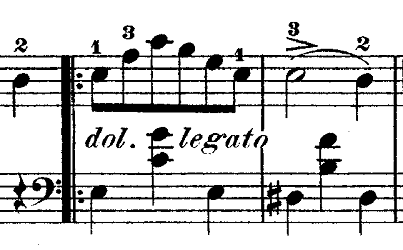 ※ “dol” is short for “dolce,” meaning “sweetly.”
※ “legato” means “smoothly.”
Be careful not to play absentmindedly, distracted by the upcoming phrase.
Interestingly, this section is related, especially in the left hand, to the phrase that follows.
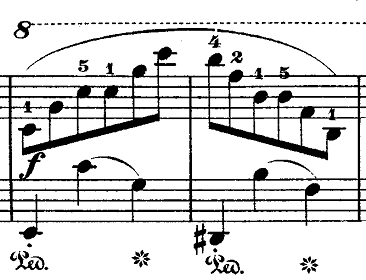
Personally, I think this is the most challenging part of the piece. It’s a highly technical section with wide leaps in both hands. (0:26~)
But don’t worry—practice it step by step, and you’ll get there.
First, practice each hand separately until you’re confident.
Once that’s done, try combining the right and left hands, but don’t attempt to play everything at once. Instead, start by playing just the first beat of the left hand together with the right hand.
After you’re comfortable with that, gradually add in the rest of the left hand, practicing slowly with both hands.
As mentioned earlier, the left hand in this section is related to the previous section. Those who’ve been playing might have noticed this, but the first beat of the left hand features the same note, albeit an octave apart, as the bass note from the earlier section.
This means you can think of this part as a variation of the earlier section. You’ll see that the harmonies are constructed with similar notes.
☆How to Play Section C: Focusing on the Lyrical and Sweet Melody
Here, the melody changes from E minor to E major. Let’s continue playing attentively. (1:11~)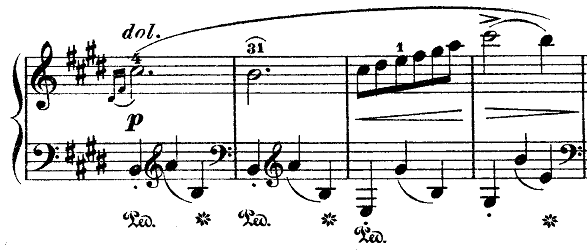 ※“dol” is an abbreviation for “dolce,” meaning “gently.”
In this section, it is important to bring out the sweet melody played by the right hand.
Play the left hand as softly as possible, as though you are stroking the keys rather than pressing them. The result will be a gentle sound. Meanwhile, for the right-hand phrases, express them emotionally and play as though you are singing.
Although this is a waltz, in Section C, rather than emphasizing the rhythm of the waltz, I personally found it more fitting to add plenty of dynamics and create a richly emotional ballad-like atmosphere.
☆How to Play Section D: Expressing Emotional Ups and Downs
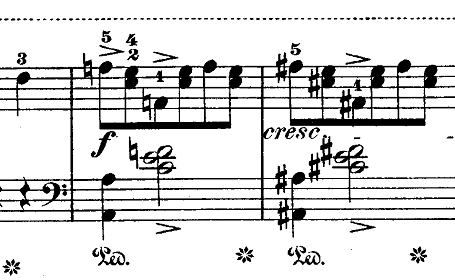
In Section D, the mood shifts dramatically from the sweet atmosphere earlier to a tense one. (1:41~)
Let’s look at the first measure of the sheet music above.
The right hand plays heavy chords, while the left hand takes the main melody here. The key point to note is the balance of volume between the right and left hands.
Although the dynamic marking indicates “fortissimo” (meaning “very strong”), simply playing everything loudly can obscure what you want to emphasize. This is true not only for this piece but for many others as well.
In this part, what you want to emphasize is more the left hand. While the right-hand chords should indeed be played strongly as indicated, you should slightly adjust the volume to give priority to the left hand.
The pedal also plays an important role here. Considering the structure of the notes in the left and right hands, you may notice that there are many dissonant notes scattered throughout.
Therefore, if you choose to use the pedal, press it lightly and in small intervals to avoid muddying the sound and achieve a clear tone. Incidentally, I tend to decide whether or not to use the pedal in this section depending on my mood that day. I’m a moody mole, after all.
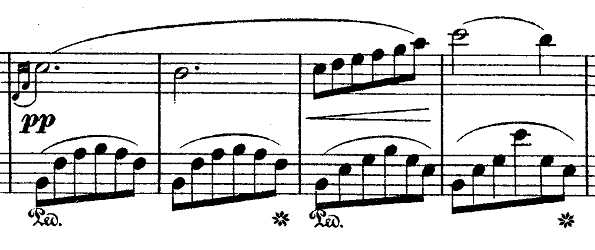
In the latter half, a sweet melody similar to Section C appears again. However, in this part, the left hand plays arpeggios. (1:58~)
Of course, the left hand should still be played gently, but adding subtle dynamics (such as building up slightly in line with the movement of the notes) can further enhance the overall atmosphere.
☆How to Play Section E: Express Yourself Freely
Finally, we’ve reached the grand finale. The interpretation of Section E really varies from person to person, so this is your chance to fully express your individuality. (2:28~)That said, much like Section B, I think this part is quite challenging. Some of you might even feel a bit reluctant to practice this section. Incidentally, when I was practicing this piece, I managed to progress smoothly up to Section D, but I found myself stuck when it came to this finale.
Take your time and practice little by little.
 ※The dotted lines on the score mean “play one octave higher.”
In the above score, the main melody is likely played with the right hand, in my opinion. (2:38~)
There are accents marked here and there, but I personally don’t think you need to strictly follow the instructions in the sheet music.
This is because sheet music interpretations can vary greatly depending on the publisher.
Especially for details like accents, staccatos, and dynamic markings, it’s not uncommon to find significant differences when comparing scores from different publishers.
Back to the topic, if it were me, I would focus more on the second beat rather than the first in both hands for this section. Just as publishers differ in their interpretations, there is no right or wrong way to play. Imagine your own interpretation.
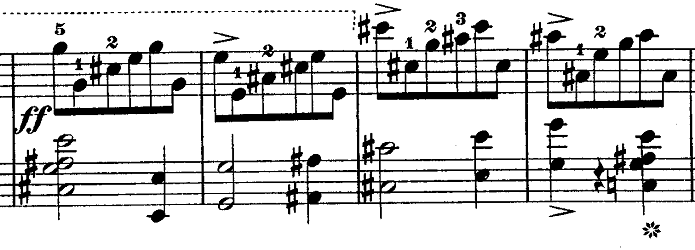
For this part, I get the impression of a rivalry between the right hand and the left hand—both refusing to yield even an inch and passionately asserting their opinions. What an intense passage! (2:41~)
When practicing this section, it’s easy to lose focus on each individual note as the tempo tends to increase toward the end (of course, speeding up intentionally as an interpretation is perfectly valid). Start by practicing with a metronome to maintain a steady tempo.
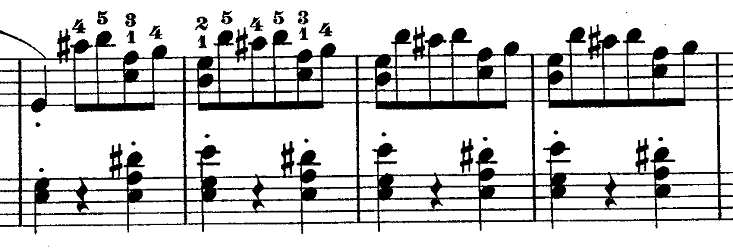
In this section, the right hand plays repeated similar phrases, but to avoid a monotonous sound, try adding accents at specific points. Although there are no specific instructions in the score, emphasizing certain notes can create a more dynamic sound. I recommend adding accents to the right hand where the left hand chords are played. (2:46~)
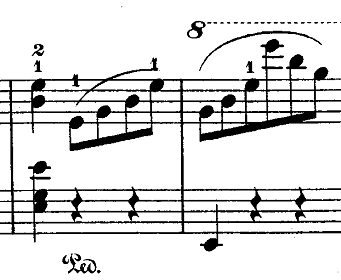
As for this final large right-hand arpeggio, it’s the grand finale, so you’ll want to make it as stylish as possible. (2:50~)
While the arpeggio itself is not particularly difficult, maintaining the tempo can lead to noticeable mistakes in my case.
For years, I had the misguided belief that “playing fast = playing well.” I practiced this part with the goal of playing it as quickly and fluidly as possible.
Of course, playing fast and fluidly is a valid interpretation and not wrong by any means, but at some point, I started to feel, “This doesn’t quite feel right.”
So, I tried the opposite approach—slowing down the tempo and playing with a sense of gravity. To my surprise, I discovered, “This actually works quite well.”
Whether you play fast or slow, lightly or with a sense of weight, the choice is entirely yours. However, one thing remains the same: no matter the style, you should play with care. First, make the piece your own, then add your personal touch.
Check the Key Points! Summary of Overall Playing Tips

Well, how was it so far?
Here is a summary of the overall tips for playing Chopin’s Waltz No. 14 in E Minor, Op. Posth.:
1. Thoroughly understand the structure of the piece during the initial sight-reading stage (overall).
2. Keep the right hand light and nimble, and practice challenging sections with leaps patiently and gradually (especially Section A and Section B).
3. Consider carefully whether the pedal is necessary, and avoid using it unnecessarily in sections where it is not required (especially Section A and Section B).
4. Play the middle section with rich emotion, expressing it as if singing (especially Section C and Section D).
5. The latter half is where individuality shines the most, so make sure to master the basics and add your own personal touch to your performance (especially Section E).
Keep these five tips in mind as you practice.
This piece has many transitions that are enjoyable for both the player and the listener. I believe it is a piece everyone can truly enjoy. Treasure a performance full of individuality.
Good luck with your practice! I’ll be cheering you on every single day from deep underground!
- IMSLP (Sheet Music Link)
This article was created using this sheet music, which was published by Schirmer in 1894 and is in the public domain. It includes two pieces, “No. 14” and “No. 15”.
- Ranking Chopin’s Waltzes by Difficulty: A Piano Teacher’s Perspective 2017/3/17
- Perfect for a Piano Recital! Chopin's “Minute Waltz”: Difficulty and 3 Tips for Playing It 2017/5/25
- How to Master Chopin’s “Grande Valse Brillante”: Difficulty Level and Essential Waltz Techniques 2017/6/2
- Play with Fingerings That Suit You! Chopin’s “Grande Valse Brillante” Difficulty and Tips for Playing 2017/6/29
- How to Master Chopin's “Minute Waltz”: 8 Essential Tips and Difficulty Insights from a Mole 2017/7/6
- Master Chopin's “Waltz No. 7, Op. 64-2”: Tips, Tricks, and Difficulty Level Explained 2017/7/14
- Charming & Lyrical! Tips and Difficulty Level of Chopin's Waltz No. 14 in E Minor, Posthumous 2017/8/6 ←Currently Viewing Article
- Romantic Love! Chopin’s Waltz No. 9 Op. 69-1 Tips and Difficulty Level (“Farewell Waltz” or “Valse de l'adieu”) 2017/11/8
- The World of Brilliant Waltzes! How to Play and the Difficulty Level of Chopin’s “Grande Valse Brillante” 2017/12/6
- Chopin's Waltz No. 10, Op. 69-2: A Beginner’s Guide to Playing, Mastering, and Understanding Its Difficulty 2017/12/16
- Chopin’s Puppy Waltz Simplified: Easy Tips, Difficulty Level, and Playing Guide for Waltz No. 6 in D-flat Major, Op. 64-1 2018/3/9
- Chopin’s Waltz No. 15 in E Major: A Hidden Gem with Playing Tips and Difficulty Level Explained 2018/3/19
- Chopin’s Waltz No. 3 (Grande Valse Brillante) in A Minor, Op. 34-2: Difficulty and Playing Tips 2018/5/19
- Is Chopin’s “Minute Waltz” Hard? Learn 7 Tips to Conquer It Today 2019/8/1

